🚀 Getting Started
📋 API Configuration
VideoLingo uses an LLM for translation. TTS is optional and only needed for dubbing. Choose your own provider and model.
1. Get API_KEY for LLM:
Set the API URL, key and model in the sidebar. The client uses OpenAI-compatible Chat Completions, with structured JSON required by several processing steps. Use a model supported by your endpoint; parameter count alone does not establish translation quality or JSON reliability. Enable JSON mode only if supported.
For example, an OpenRouter API URL is https://openrouter.ai/api/v1; no particular
model is required. A local compatible server can also be used. The application
requires a non-empty key field even when that server does not authenticate requests;
use a placeholder only for a server that explicitly ignores the key. Edge TTS
requires network access and is not an offline synthesizer.
2. TTS API
VideoLingo provides multiple TTS integration methods. Here's a comparison (skip if only using translation without dubbing)
| TTS Solution | Provider | Pros | Cons | Chinese Effect | Non-Chinese Effect |
|---|---|---|---|---|---|
| 🔊 Azure TTS ⭐ | 302AI (opens in a new tab) | Natural effect | Limited emotions | 🤩 | 😃 |
| 🎙️ OpenAI TTS | 302AI (opens in a new tab) | Realistic emotions | Chinese sounds foreign | 😕 | 🤩 |
| 🎤 Fish TTS | 302AI (opens in a new tab) | Authentic native | Limited official models | 🤩 | 😂 |
| 🎙️ SiliconFlow FishTTS | SiliconFlow (opens in a new tab) | Voice Clone | Unstable cloning effect | 😃 | 😃 |
| Edge TTS | Online service | No separate API key in this adapter | Requires network access | — | — |
| 🗣️ GPT-SoVITS | Local | Best voice cloning | Only supports Chinese/English, requires local inference, complex setup | 🏆 | 🚫 |
- For SiliconFlow FishTTS, get key from SiliconFlow (opens in a new tab), note that cloning feature requires paid credits;
- For OpenAI TTS, Azure TTS, and Fish TTS, use 302AI (opens in a new tab) - one API key provides access to all three services
For a custom TTS adapter, edit
core/tts_backend/custom_tts.py.
SiliconFlow FishTTS Tutorial
Currently supports 3 modes:
preset: Uses fixed voice, can preview on Official Playground (opens in a new tab), default isanna.clone(stable): API modecustom; combines eligible reference segments from the task list, subject to text-length and duration limits, and uploads a reusable voice. This is not necessarily the first ten seconds of the video.clone(dynamic): API modedynamic; uses the current sentence's reference clip. Voice consistency and quality depend on the reference and service, with no guaranteed improvement over custom mode.
How to choose OpenAI voices?
Voice list can be found on the official website (opens in a new tab), such as alloy, echo, nova, etc. Modify openai_tts.voice in config.yaml.
How to choose Azure voices?
Recommended to try voices in the online demo (opens in a new tab). You can find the voice code in the code on the right, e.g. zh-CN-XiaoxiaoMultilingualNeural
How to choose Fish TTS voices?
Go to the official website (opens in a new tab) to listen and choose voices. Find the voice code in the URL, e.g. Dingzhen is 54a5170264694bfc8e9ad98df7bd89c3. Popular voices are already added in config.yaml. To use other voices, modify the fish_tts.character_id_dict dictionary in config.yaml.
GPT-SoVITS-v2 Tutorial
-
Check requirements and download the package from official Yuque docs (opens in a new tab).
-
Place
GPT-SoVITS-v2-xxxandVideoLingoin the same directory. Note they should be parallel folders. -
Choose one of the following ways to configure the model:
a. Self-trained model:
- After training,
tts_infer.yamlunderGPT-SoVITS-v2-xxx\GPT_SoVITS\configswill have your model path auto-filled. Copy and rename it toyour_preferred_english_character_name.yaml - In the same directory as the
yamlfile, place reference audio namedyour_preferred_english_character_name_reference_audio_text.wavor.mp3, e.g.Huanyuv2_Hello, this is a test audio.wav - In VideoLingo's sidebar, set
GPT-SoVITS Charactertoyour_preferred_english_character_name.
b. Use pre-trained model:
- Download my model from here (opens in a new tab), extract and overwrite to
GPT-SoVITS-v2-xxx. - Set
GPT-SoVITS CharactertoHuanyuv2.
c. Use other trained models:
-
Place
xxx.ckptinGPT_weights_v2folder andxxx.pthinSoVITS_weights_v2folder. -
Following method a, rename
tts_infer.yamland modifyt2s_weights_pathandvits_weights_pathundercustomto point to your models, e.g.:# Example config for method b: t2s_weights_path: GPT_weights_v2/Huanyu_v2-e10.ckpt version: v2 vits_weights_path: SoVITS_weights_v2/Huanyu_v2_e10_s150.pth -
Following method a, place reference audio in the same directory as the
yamlfile, namedyour_preferred_english_character_name_reference_audio_text.wavor.mp3, e.g.Huanyuv2_Hello, this is a test audio.wav. The program will auto-detect and use it. -
⚠️ Warning: Please use English for
character_nameto avoid errors.reference_audio_textcan be in Chinese. Currently in beta, may produce errors.
# Expected directory structure: . ├── VideoLingo │ └── ... └── GPT-SoVITS-v2-xxx ├── GPT_SoVITS │ └── configs │ ├── tts_infer.yaml │ ├── your_preferred_english_character_name.yaml │ └── your_preferred_english_character_name_reference_audio_text.wav ├── GPT_weights_v2 │ └── [your GPT model file] └── SoVITS_weights_v2 └── [your SoVITS model file] - After training,
After configuration, select Reference Audio Mode in the sidebar (see Yuque docs for details). During dubbing, VideoLingo will automatically open GPT-SoVITS inference API port in the command line, which can be closed manually after completion. Note that stability depends on the base model chosen.
🛠️ Quick Start
VideoLingo supports Windows, macOS and Linux systems, and can run on CPU or GPU.
Prerequisites
Install Git (opens in a new tab), uv (opens in a new tab) and FFmpeg (opens in a new tab). The linked uv page provides standalone installers that do not require Python. Reopen your terminal and check git --version, uv --version and ffmpeg -version.
On Windows, choose an FFmpeg shared-library build and add its bin directory to PATH. On macOS use brew install ffmpeg; on Debian/Ubuntu use sudo apt install ffmpeg. TorchCodec needs compatible FFmpeg shared libraries in addition to the CLI. Subtitle rendering needs the subtitles filter and suitable fonts; the installer checks/installs Noto CJK fonts on Linux.
The pinned TorchCodec 0.7 supports FFmpeg 4–7, not FFmpeg 8/9. Use a shared
FFmpeg 7 build. On Windows, this BtbN 7.1 shared build (opens in a new tab)
was downloaded and verified with real audio decoding. Extract it and put its
bin directory ahead of other FFmpeg versions on PATH. VideoLingo registers that
directory for Windows DLL loading. Package managers may supply newer incompatible
FFmpeg libraries, so check the version rather than assuming latest works.
GPU runtime
- Install a driver compatible with your NVIDIA GPU.
nvidia-smireports the driver's CUDA capability, not an installed Toolkit version. - On hosts, the installer selects PyTorch
cu128for a reported capability >=12.8, otherwisecu126when NVIDIA is detected. An unreadable capability falls back to cu126, which is not a guarantee of compatibility with an old driver. Without NVIDIA it selects CPU packages. Compatible existing packages may be reused. - Local WhisperX GPU execution needs CUDA 12 cuBLAS and cuDNN 9 accessible to the process. See faster-whisper's GPU requirements (opens in a new tab) and CTranslate2 4.5's cuDNN 9 transition (opens in a new tab).
- If the libraries are missing on Windows, obtain CUDA 12 libraries from NVIDIA's CUDA 12.8 Update 1 archive (opens in a new tab) and cuDNN 9 for CUDA 12 from NVIDIA (opens in a new tab). Add the actual DLL directories to PATH and reopen the terminal. Do not invent a cuDNN directory by substituting the PyTorch build tag into an example path.
- On Linux, follow faster-whisper's linked instructions for exposing the installed cuBLAS/cuDNN libraries through
LD_LIBRARY_PATHbefore starting Python. The Docker image includes these runtime libraries.
The installer selects Python wheels; it does not install a system CUDA Toolkit. Newer CUDA 13-capable drivers do not require CUDA 13 Python packages for this project.
Install with uv
uv provisions Python 3.13 in .venv. Existing application environments are supported on Python 3.10–3.13. The bootstrap command below does not require a preinstalled Python.
-
Clone the project:
git clone https://github.com/Huanshere/VideoLingo.git cd VideoLingo -
Create the environment and install dependencies:
uv run --no-project --python 3.13 setup_env.pysetup_env.pydelegates toinstaller.py: bootstrap packages, matched Torch/torchaudio/torchvision, application requirements, spaCy/WhisperX checks, optional PyPI Demucs 4.1, project metadata, fonts and environment checks. Demucs uses normal dependency resolution. Use--sharedto select~/.venvs/videolingo, or--pathfor a custom location. -
🎉 Launch Streamlit app:
.venv\Scripts\streamlit run st.py        # Windows
.venv/bin/streamlit run st.py            # macOS / Linux
Or double-click
OneKeyStart.baton Windows. -
Open
http://localhost:8501and configure your OpenAI-compatible API URL, key and model in the sidebar.OneKeyStart.batprefers the shared venv, then the project's.venv; use the explicit environment command above if you want that checkout's local environment.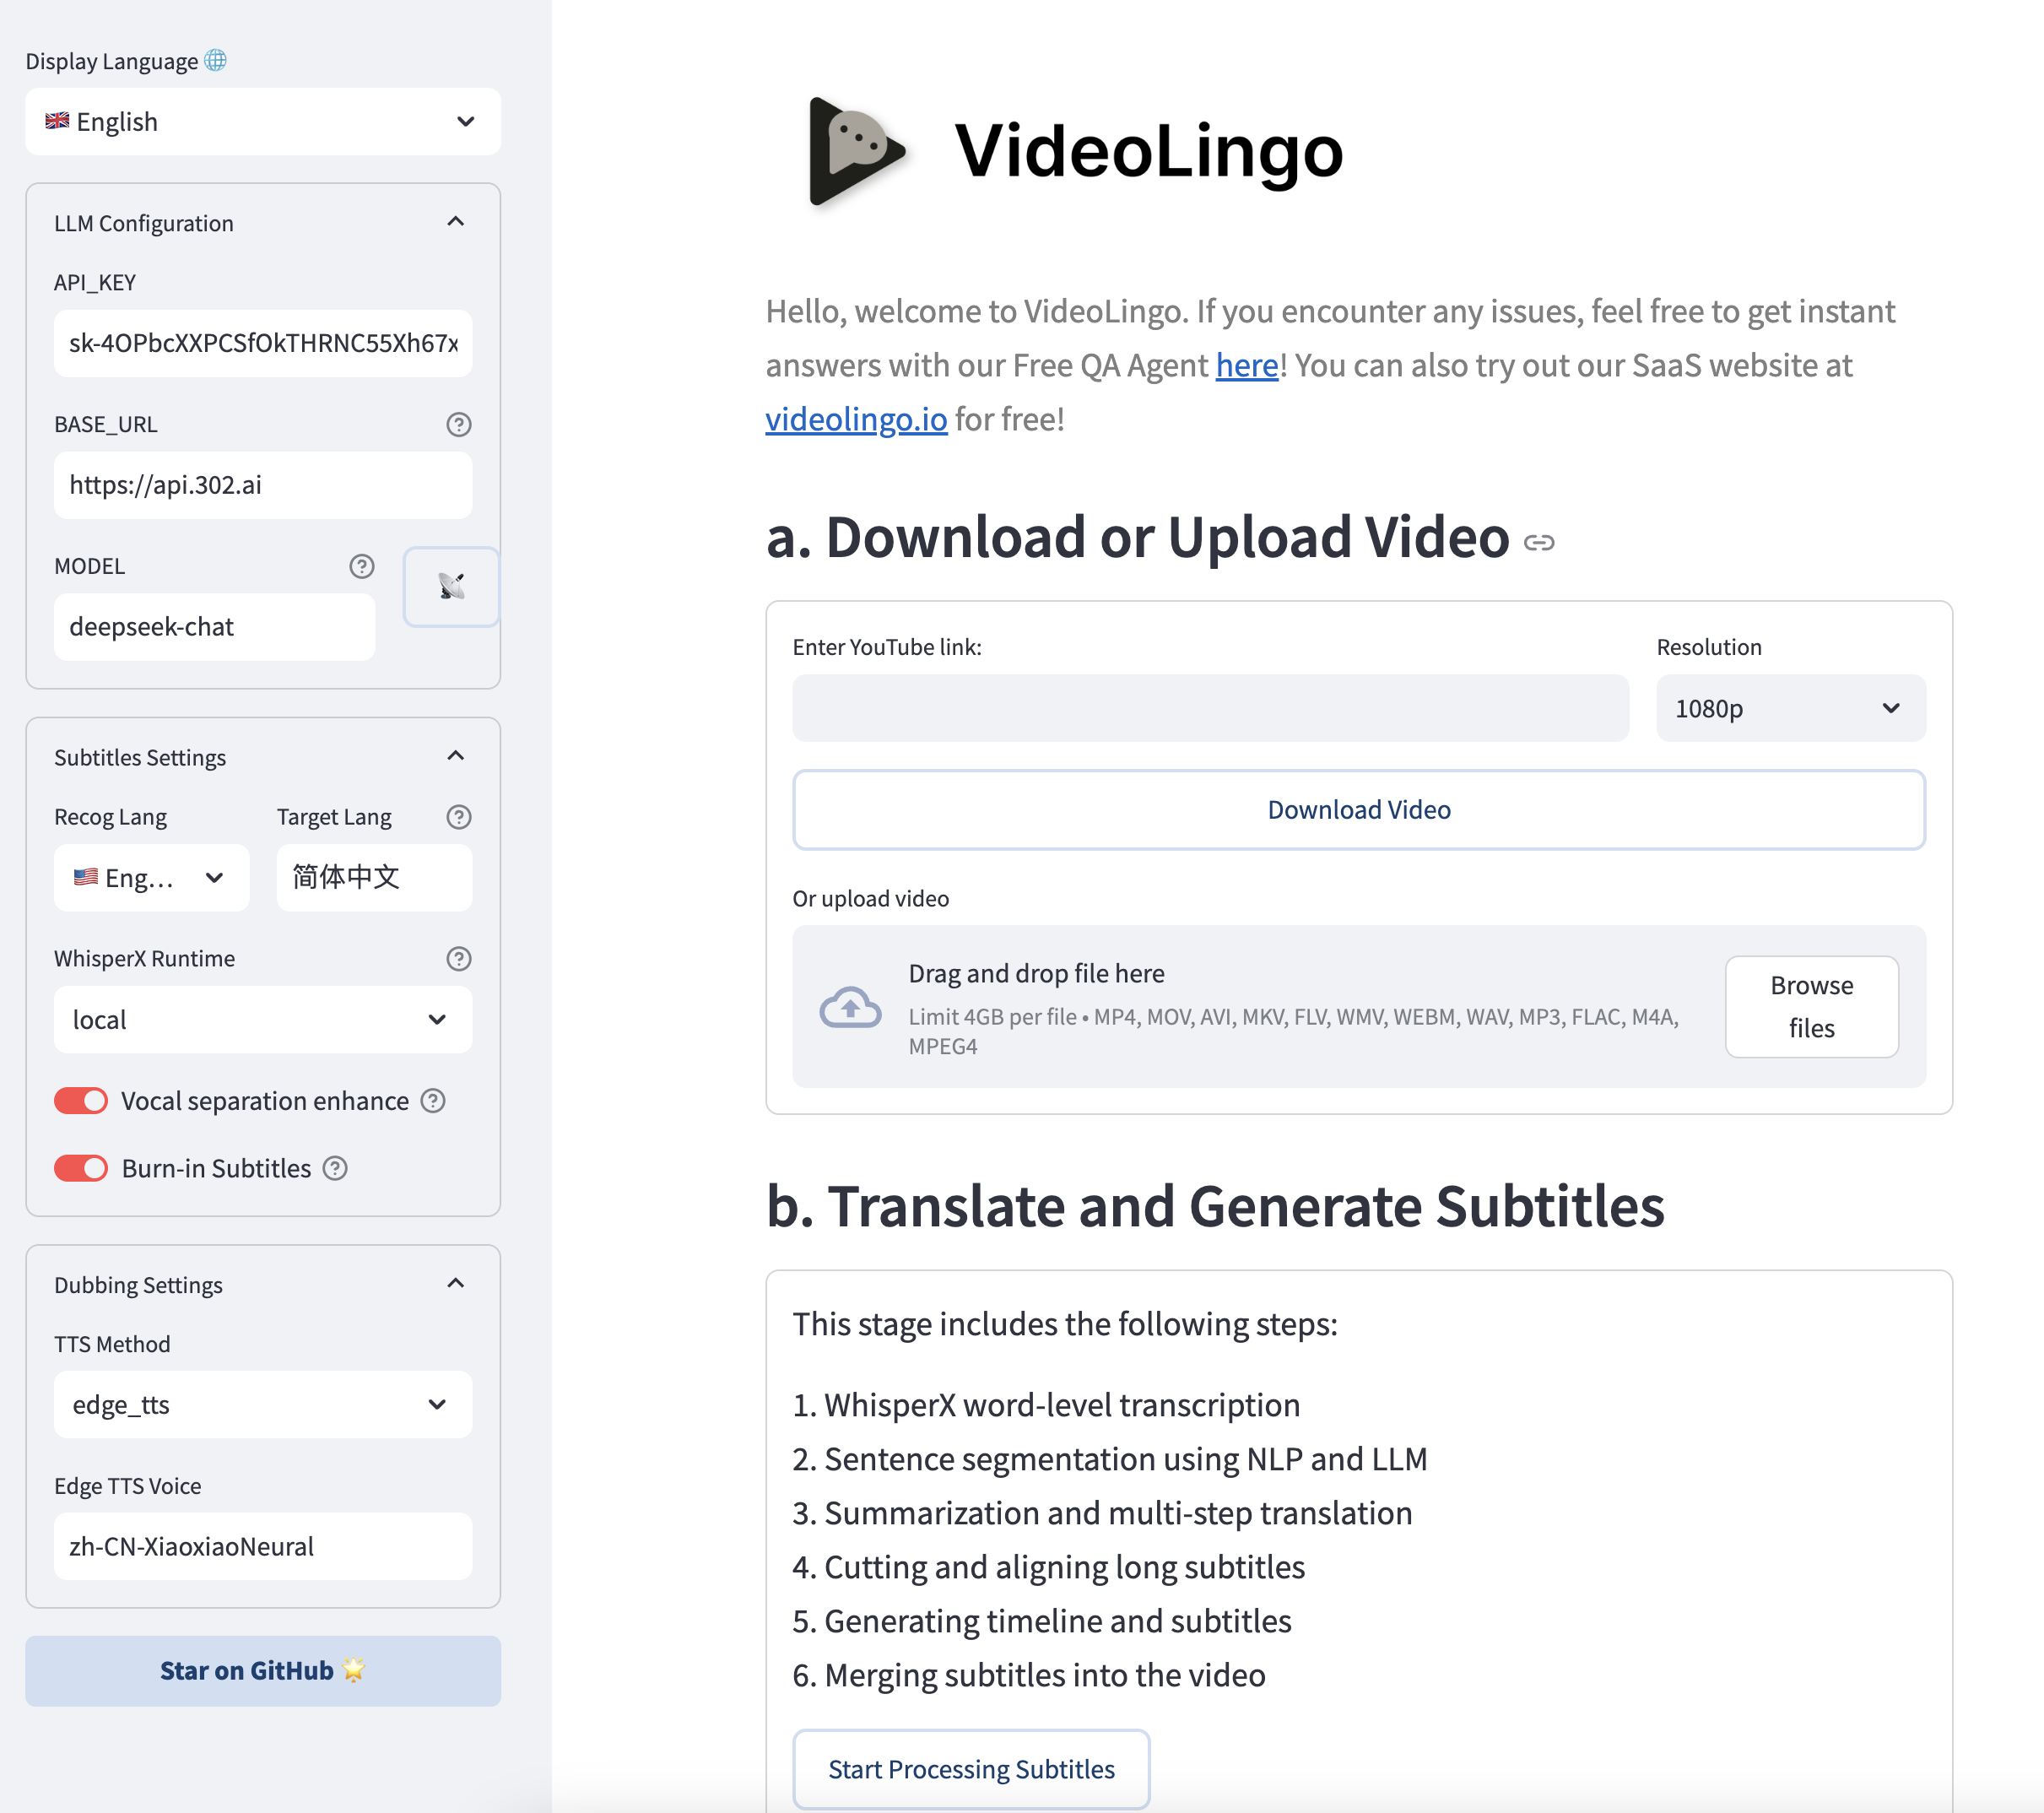
-
(Optional) More settings can be manually modified in
config.yaml, watch command line output during operation. To use custom terms, add them tocustom_terms.xlsxbefore processing, e.g.Baguette | French bread | Not just any bread!.
Need help? Our AI Assistant (opens in a new tab) is here to guide you through any issues!
🏭 Batch Mode (beta)
Note: This section is still in early development and may have limited functionality
🚨 Common Errors & Pitfalls
-
'All array must be of the same length' or 'Key Error' during translation:
- Reason 1: Weaker models have poor JSON format compliance causing response parsing errors.
- Reason 2: LLM may refuse to translate sensitive content.
Inspect
resp_content,respandmessageinoutput/gpt_log/error.json. Failed validation is logged separately from successful response caches. Diagnose the failing stage before clearing its cached results.
-
'Retry Failed', 'SSL', 'Connection', 'Timeout': Usually network issues. Solution: Users in mainland China please switch network nodes and retry.
-
local_files_only=True: The selected local model or cache is incomplete. Check the model path and required files. An offline lookup cannot download missing weights; a ping alone does not establish model availability.
-
cublas64_12.dll not found: The process cannot locate CUDA 12 cuBLAS. Check the selected environment, its Torch CUDA build and library search paths using the GPU instructions above. A newer driver alone does not supply this DLL. -
Whisper model loading segfaults silently: ctranslate2 version mismatches cuDNN version. Solution: Ensure
ctranslate2>=4.5.0(supports cuDNN 9, which PyTorch 2.6+ ships with). -
RuntimeError: Weights only load failed: PyTorch ≥2.6 changedtorch.loaddefault behavior. Solution: Already fixed via monkey-patch inwhisperX_local.py. If you see this, your code is not up to date. -
WhisperX transcription hangs in Streamlit (CPU/GPU idle):
librosa.load()deadlocks in Streamlit's non-main thread. Solution: Already fixed by replacing withwhisperx.audio.load_audio()(ffmpeg subprocess). If you see this, your code is not up to date. -
spaCy model missing: Check that the model was installed into the same environment used to launch VideoLingo. For example, install the English model using that environment's Python:
.venv\Scripts\python -m spacy download en_core_web_md -
Torch package versions disagree: Run the selected environment's
python installer.py --check, thenpython installer.pyto repair. The supported family is Torch/torchaudio 2.8.0 with torchvision 0.23.0, using one matching CPU/CUDA build. Current Demucs is PyPI 4.1, not the older Git package requiring a--no-depsworkaround.